BizCRM App
Step-by-Step Guide to Managing and Adding Custom Fields in Business Modules
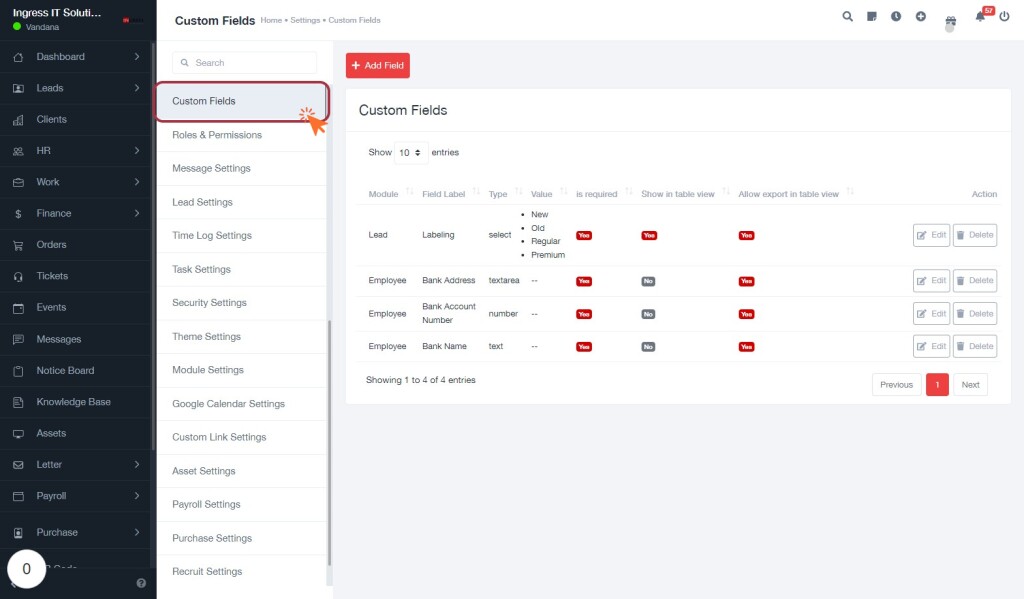
STEP 1: Click on "Custom Fields" to Access Field Settings
- Navigate to the Custom Fields section by clicking on the highlighted area.
- This section allows you to manage various custom fields associated with different modules, such as Leads and Employees.
- You can view existing fields, including their labels, types, and values.
- To add a new field, click on the Add Field button located at the top right of the screen.
- Use the search bar to quickly find specific fields or filter the displayed entries as needed.
This will help you efficiently manage your custom fields.
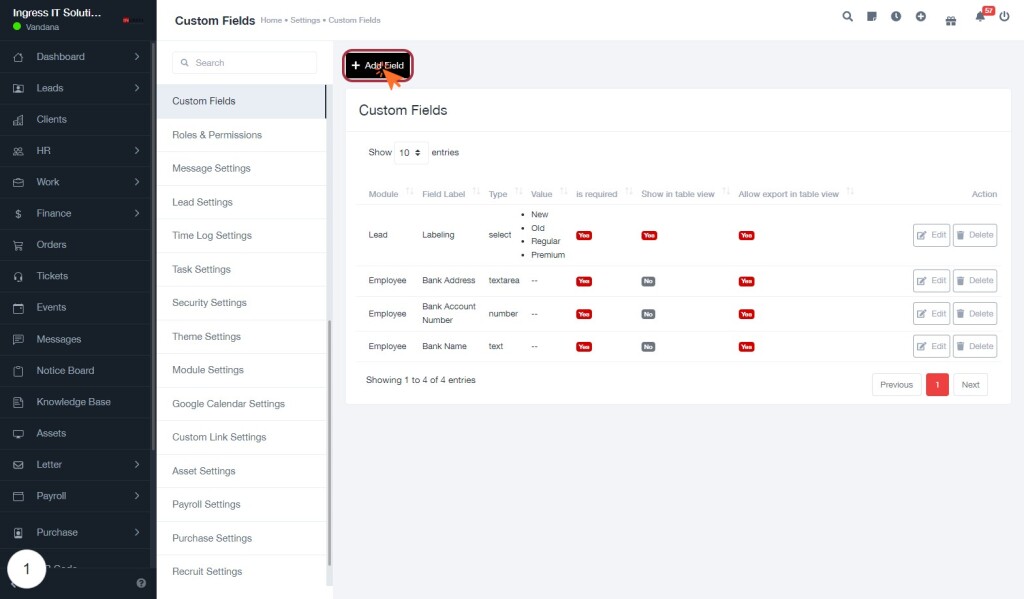
STEP 2: Click "Add Field" to Create Custom Fields
- Locate the "Add Field" button positioned at the top right of the Custom Fields section.
- Click on the button to initiate the process of adding a new custom field.
- A form will appear, prompting you to enter details such as Module, Field Label, Type, and Value.
- Fill in the required information:
- Module: Select the relevant module from the dropdown.
- Field Label: Provide a descriptive name for the field.
- Type: Choose the appropriate data type (e.g., text, number).
- Value: Specify any default value if necessary.
- Ensure all required fields are completed before saving your new custom field.
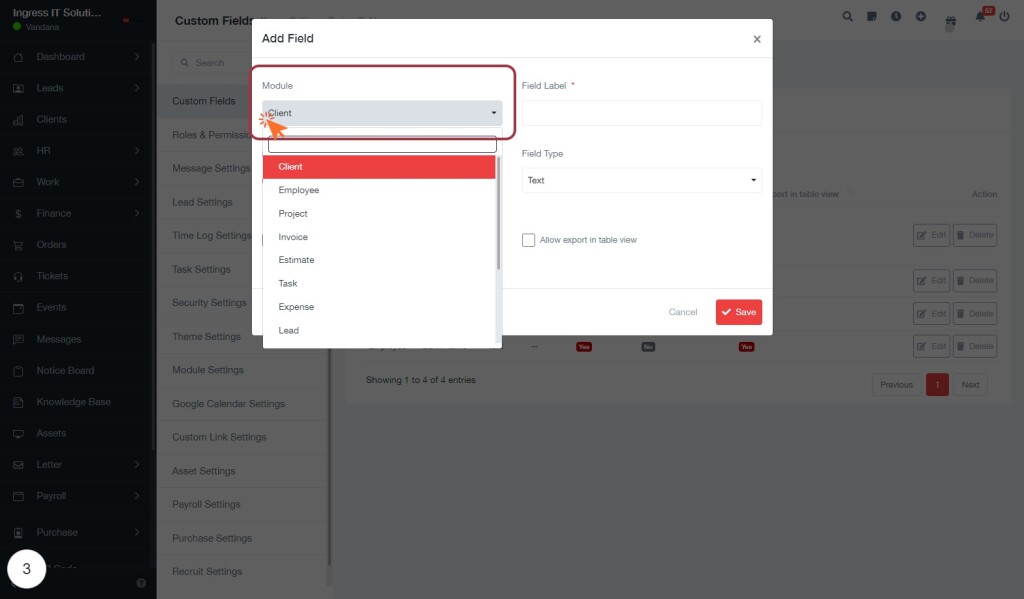
STEP 4: Select Module from Dropdown
- Click on the "Module" dropdown menu located in the "Add Field" section.
- A list of available options will appear, including "Client," "Employee," "Project," and more.
- Use the scroll feature or type to quickly find your desired module.
- Once you locate the appropriate module, click on it to select.
- Ensure your selection aligns with the field label you intend to create, as this will define the context of your custom field.
This step is crucial for organizing your data effectively.
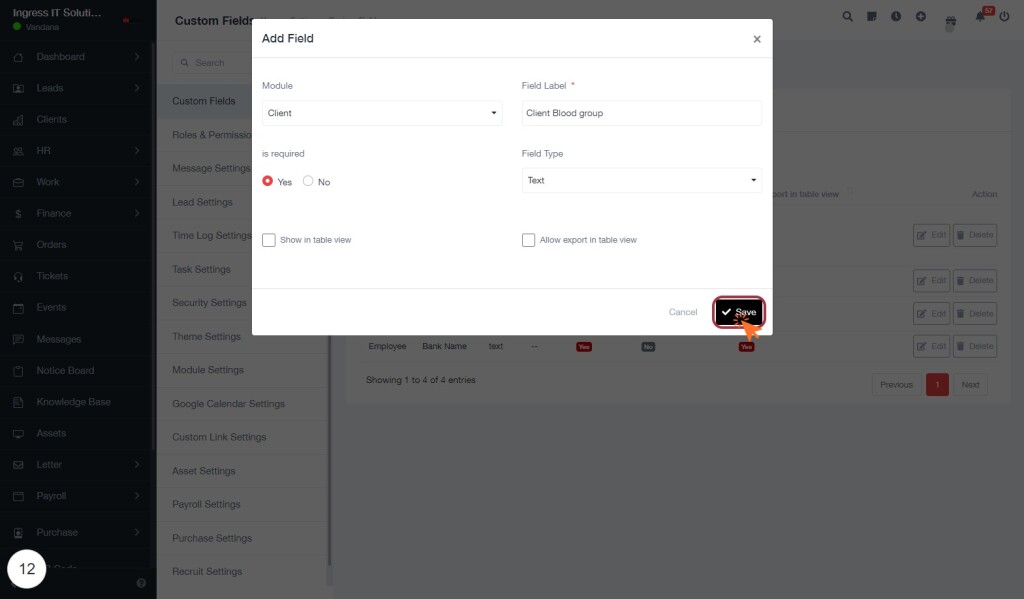
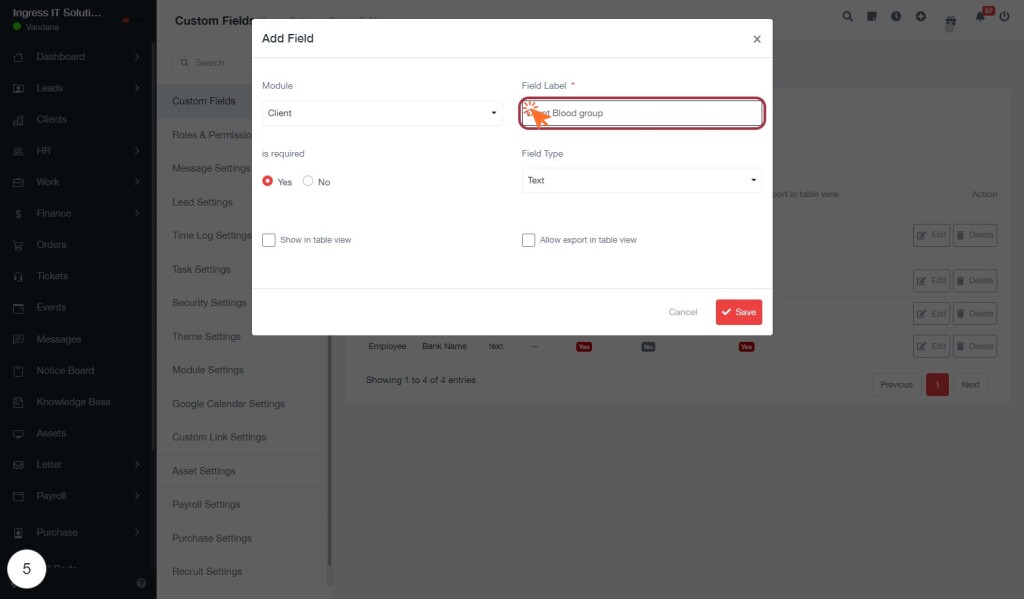
STEP 5: Enter Field Label for Client Information
- Click on the highlighted input box labeled "Field Label" to enter the desired name for the field.
- Type "Client Blood group" to specify the information you wish to collect.
- Ensure that the field is marked as required by selecting "Yes" if necessary.
- Choose the appropriate field type from the dropdown menu (e.g., Text).
- Review other options like "Show in table view" and "Allow export in table view" based on your needs.
- Once all information is entered, click the "Save" button to finalize your changes.
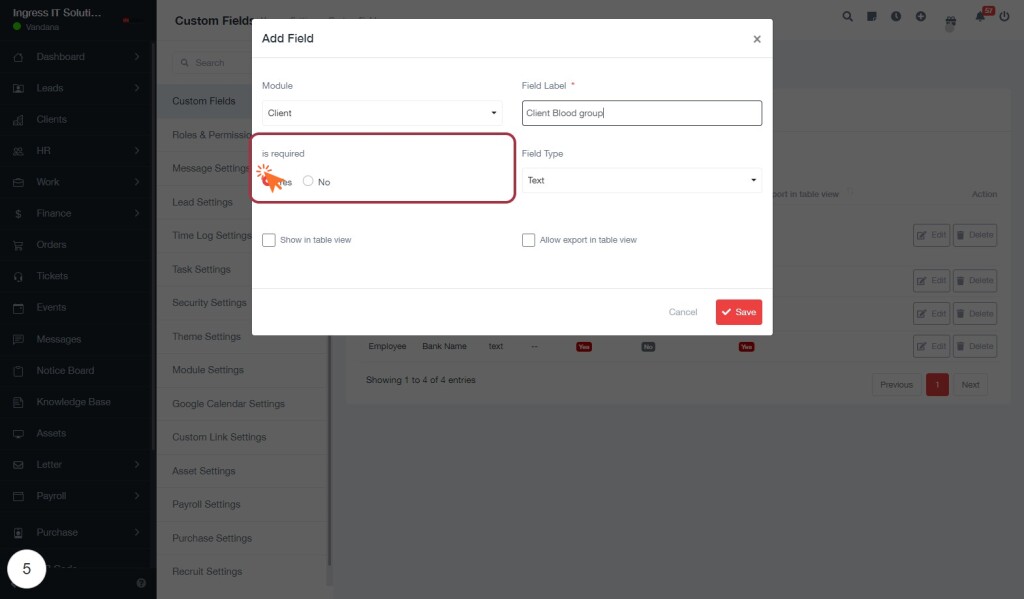
STEP 6: Select Required Field Option for Custom Fields
- Locate the "is required" section in the Add Field form.
- You will see two options: Yes and No.
- Click on Yes if you want this field to be mandatory for users; select No if it’s optional.
- Ensure your choice aligns with the data collection needs for the Client module.
- After making your selection, review other options available in the form to finalize your custom field setup.
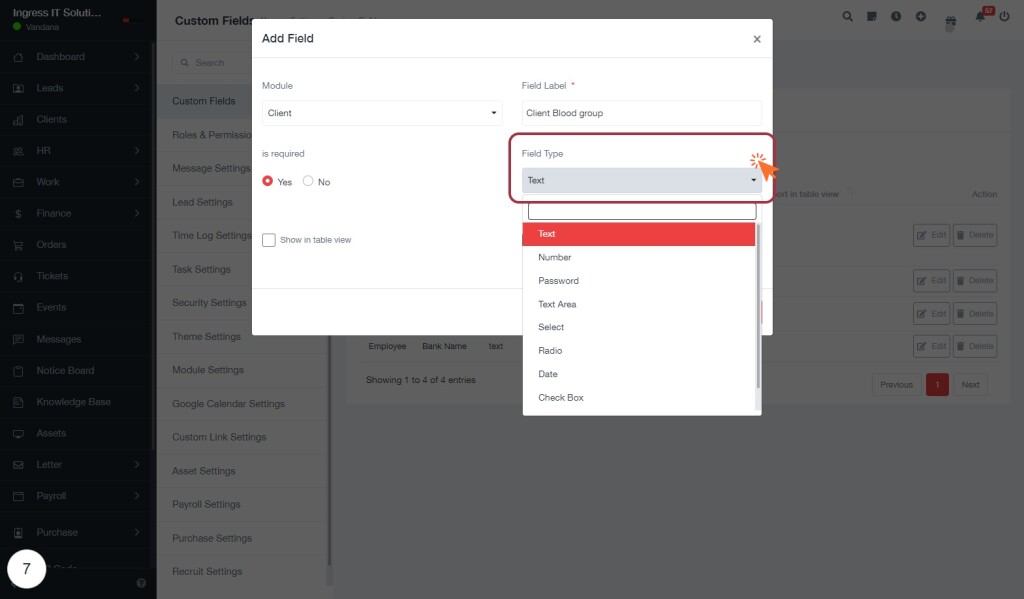
STEP 8: Select Field Type for Your Form
- Click on the dropdown menu labeled Field Type to choose the appropriate type for your new field.
- Options include Text, Number, Password, Text Area, and Select.
- Select Text if you want users to input a single line of text.
- For multi-line input, choose Text Area.
- Ensure to review the options carefully to match your data requirements.
- After making your selection, proceed to fill in the Field Label and any other necessary details.
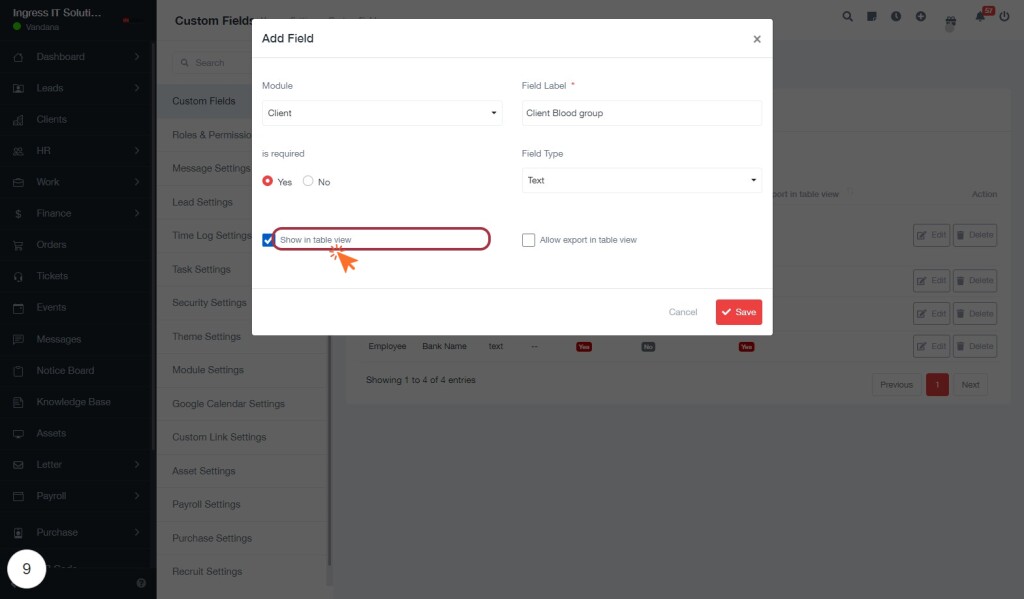
STEP 10: Select "Show in table view" Option
- Locate the "Show in table view" checkbox within the form.
- Click on the checkbox to enable this option, which allows data to be displayed in a tabular format.
- This view enhances data readability and organization, making it easier to analyze entries.
- After selecting, review other nearby options such as "Allow export" for additional functionalities.
- Ensure all other necessary fields are filled out before saving your changes to maintain data integrity.
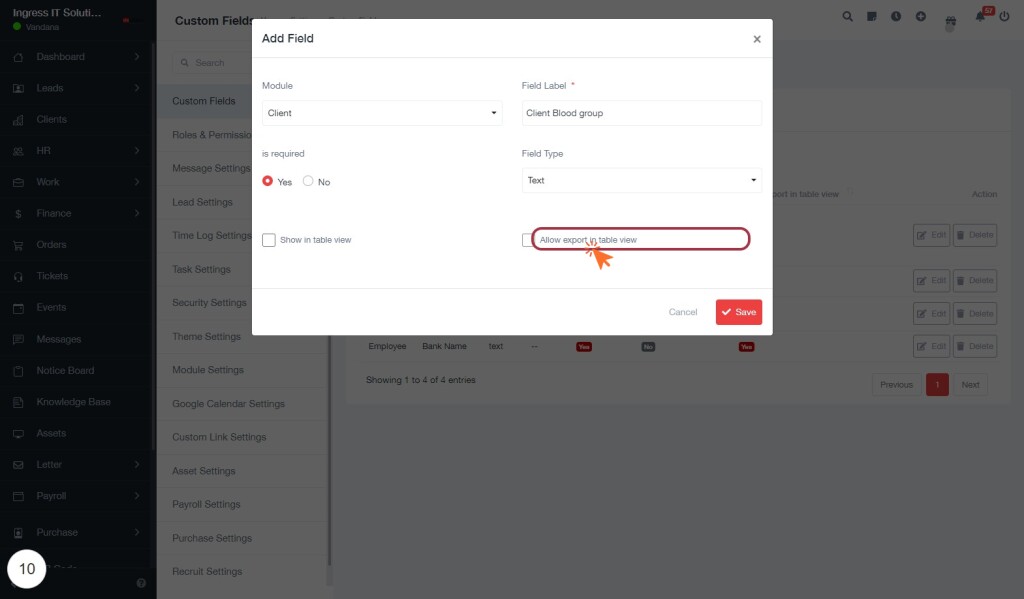
STEP 11: Click "Allow export in table view" to Enable Data Export
- Locate the checkbox labeled "Allow export in table view" within the form.
- Click on the checkbox to enable the option, which allows data to be exported in a table format.
- Ensure that this option is selected if you wish to facilitate data management and reporting.
- After making your selection, review other fields in the form to confirm all necessary information is filled out.
- Finally, click the "Save" button to apply your changes and enable the export feature.
STEP 13: Click "Save" to Confirm Your Changes
- Locate the "Save" button at the bottom of the form.
- Ensure all necessary fields are filled out correctly before proceeding.
- Click the "Save" button to confirm your entries and save the changes made in the form.
- If you wish to cancel the operation, you can click the "Cancel" button instead.
Additional Options:
- Review other fields like "Field Type" and "Allow export in table view" to ensure all settings are as desired.
- After saving, check the updated entries in the table view to verify your changes were successful.
